Civic RTSi EH1 K24A3 4WD/RWD and CRV RD2 B20V
 Gonis
Band Wagon
Gonis
Band Wagon
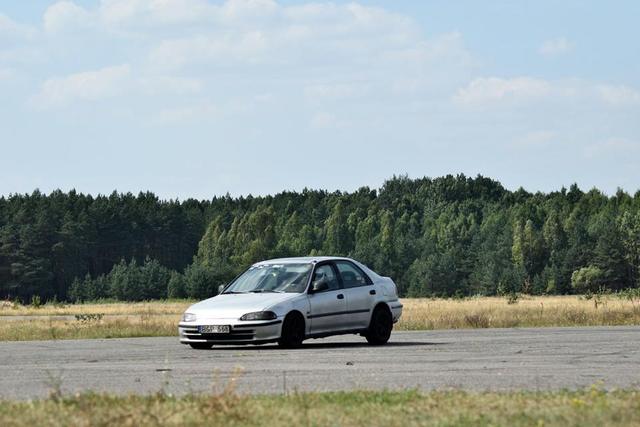
Hello, greetings from eastern Europe. I rarely comunicate in english, so please excuse for poor grammar. I would like to share the info and fotos of my vehicles. Also I appreciate any comments, critics or instructions on further modifications. EH1 First one is 95' Honda Civic RTSi. I bought it 1 and a half years ago as a new daily. I remember when I seen that kind of civic about 5 years ago... It looked so unique and appealing. That day I added that car to my wish list among other uniques. In our country these cars are very rare, I think there were no more than 10 of them. For that moment I know only 3 that are alive, and one of them is mine. Our climate and road maitenance are very ungrateful for these poor civics, almost every of these models were very rusty. And one day I saw that civic on sale. At first I wasnt very interested, because it was seriously damaged by rust and my finansial situacion was too bad to restore that body. Time passed, nobody bought it and the seller changed its mind, started body welding. After half year, he put that car on sale again, but the body was rewelded. My finanses were better and I made my decision. All my previous cars were fwd (almost all of them were civics), so this model was new experience for me. At first it was so strange to drive this car, it looks like a one of a million civic, but it acts so different. Handling was different, grip was outstanding, offroad capabilities just blew my mind. As you can see, at first I used it for offroading (just because it gave a lot of fun and this car was very good at it). My first mods were to improve offroad capability - I added to S22 tranny a slow gear (was huge improvement) and changed rear diff (that was identical to CRV) to Intrac type (had VC unit ant Viscous LSD). Also did small lift and put bigger wheels. After that it was great offroader, kicked asses to many subarus (even foresters), quattros and similar vehicles. 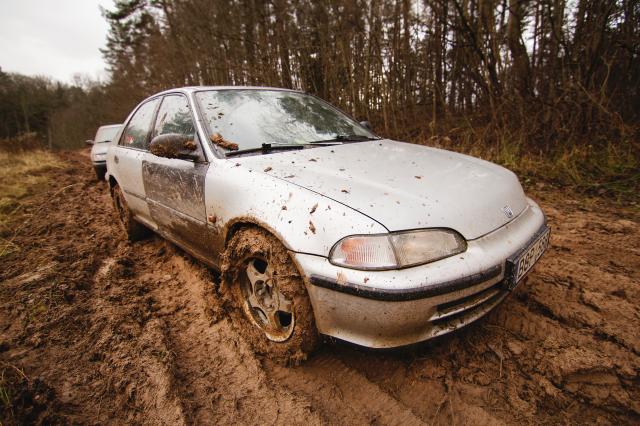
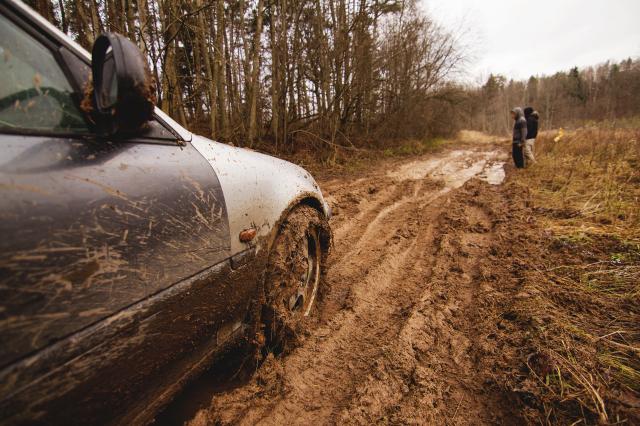
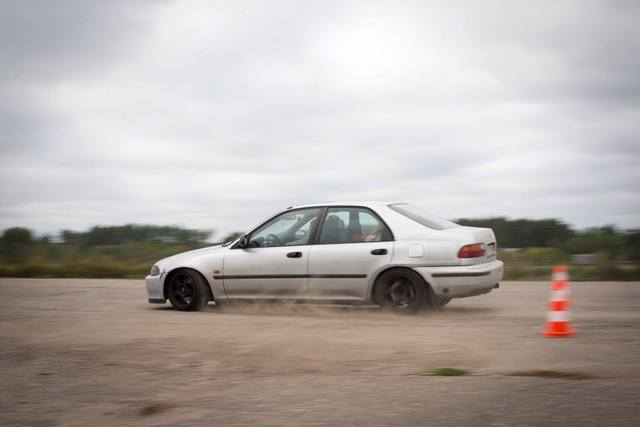
 Later that year, when winter came, I discovered that this car is very fun to drive in snow. Handling was predictable, so for amateur like me it was good start to develop driving skills. After winter I participated in track day event and was very happy with results - with this car I was much faster than earlier with more powerfull, lighter and more race type of civic. Maybe my skills advanced, but RTSi was so predictable at high speeds, that I decided to make a trackday car from that. Now it looks like this:
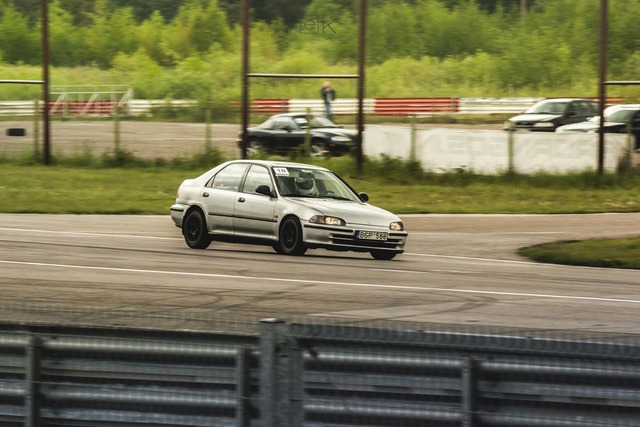
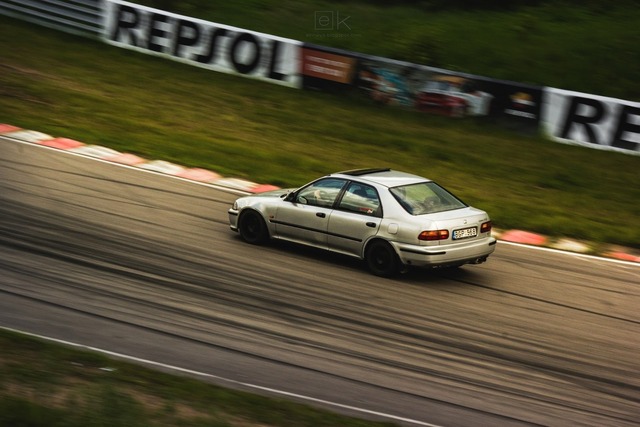
 So enough of these stories, and lets review the car. Engine: It had D16Z7 engine with S22 tranny (similar to Shuttles L3, but hydro and without SL gear). I planned to go turbo, but I had one think to worry about - transmission. S22 tranny is very rare, so the only choice would be to change it to cable L3 tranny, but it requires a lot of modifications. So I started to think how I can solve this kind of problem. One day I called to local junkyard and asked the prices of CRV tranny and engine. The prices were lower than I expected, so the fate of d series engine was clear. I bought everything I need to swap B series and in one weekend installed it. It wasnt bolt on, It needed to weld two mounts for tranny, make custom shifter cable, and of course shorten the propeller shaft. Later after some track day events I felt comfortable with that 140hp engine on a 1,3 tonn car and realised that I need more power to get better results. Car run just 16.2s 1/4mile and took 8,9s to 60mph. So I found cheap b16 head and arp studs. After ecu and cam tuning it ran 14.6s 1/4 and 6.6s to 60mph. Not bad improvement I could say.
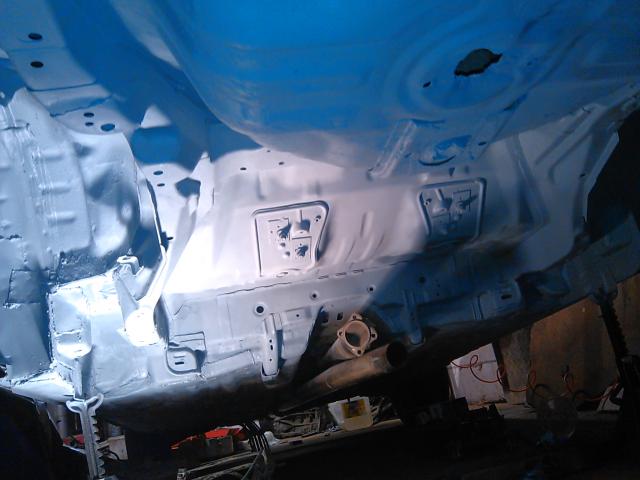
 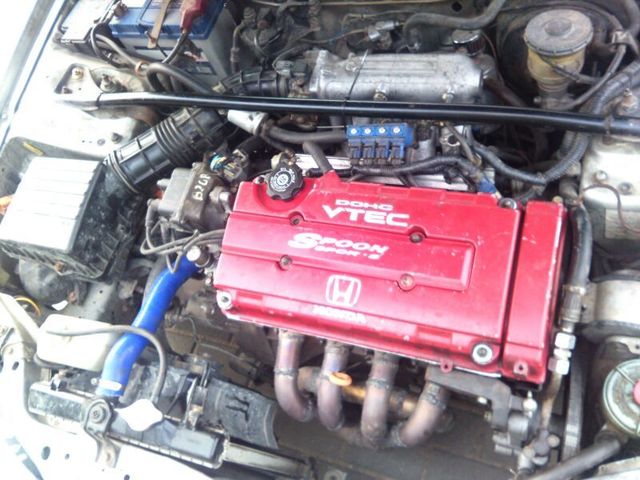 Setup at this moment: B20Z1 block with arp rod studs and oil pan baffle. B16A2 head milled 0.8mm with adjustable cam gears. Stock manifolds, 60mm exhaust, 76mm intake pipe. And also LPG system, because petrol is really expensive in comparison with average wage. Body: As I mentioned the body was damaged with rust, so I had to clean them, weld some holes and do the proper anticorrosion. Also I installed full vti interior, JDM 4gen prelude center console and double carpet for more silence. Sadly the exterior is quite trashy, because I have no practice in painting and I cant leave this car in paint shop for month as it was my only transport to work. Maybe in near future Ill manage to solve this.
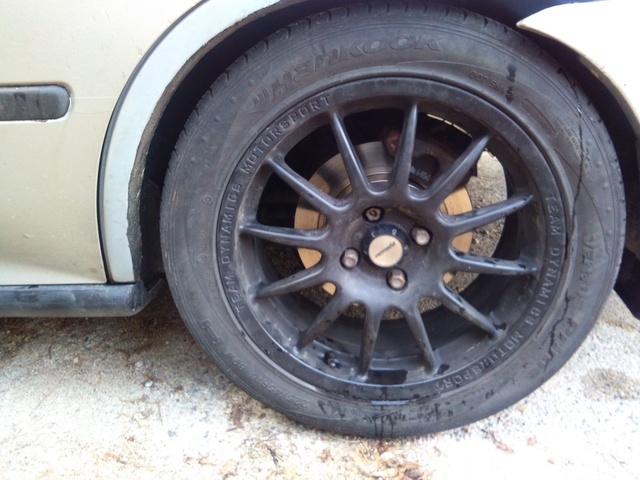
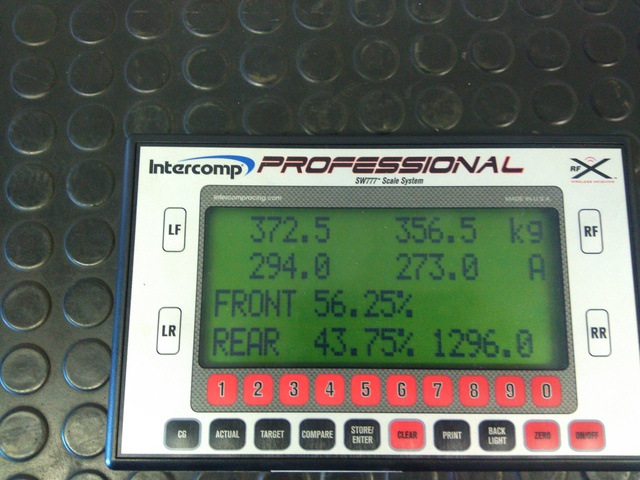 Suspension: 26mm front swaybar, no rear swaybar. Koni yellow adjustable shocks with way too soft weitec springs. All bushings changed to poliurethane. Front caster increased to 5 degree. Using Team Dynamics Pro Race 2 R15 7j wheels with BF Goodrich street tires 195/50.
  Brakes: Front 282 4x100, rear 260 4x100 discs. All parts are ATE manufacturer.
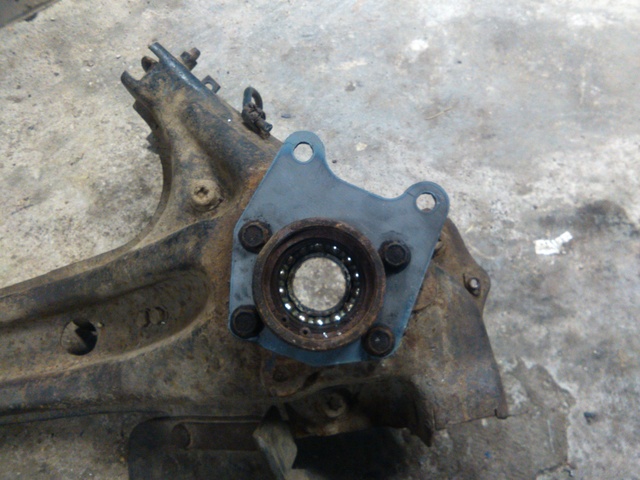
 And bonus surprise: One day I had a fun idea to experiment with exhaust manifold.
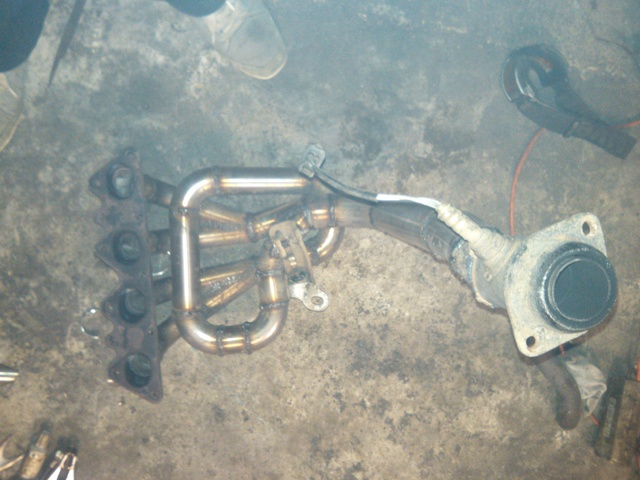
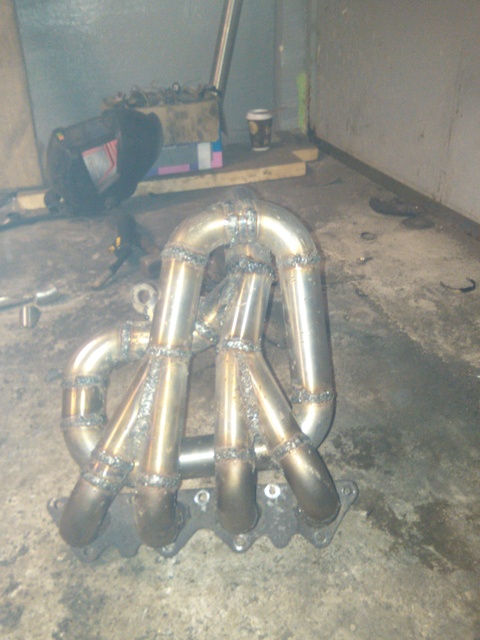 It looks like crap, but the purpose was different: https://www.youtube.com/watch?v=-1AzVbjRUd8 Obviously this manifold was total crap in HP gains, so later I changed it back to stock. Plans for next season: Make it 100kg lighter without throwing out interior. Change rear diff to cast iron from shuttle and install OBX lsd in it. Change gears to H22 setup. Stiffer spring setup RD2 About month ago I bought new daily - 00' Honda CRV. Managed to find rustless one. It has leather seats (no heating
  ), and also B20Z1 engine. I like everything in it except one con - there is no SL gear. Its very hard to climb on sandy hill. For RTSi that kind of hills was peace of cake. Also the dual pump clutch pack is not enough for difficult hills. Luckely the second issue is easy to solve. So my plans for it...
 ") Change 4 and 5 gears to longer ones from F series tranny. Instal H series LSD to front. Steal rear diff from RTSi Spray bottom with aticorrosion coating Maybe some turbo?
Change 4 and 5 gears to longer ones from F series tranny. Instal H series LSD to front. Steal rear diff from RTSi Spray bottom with aticorrosion coating Maybe some turbo? 


 Later that year, when winter came, I discovered that this car is very fun to drive in snow. Handling was predictable, so for amateur like me it was good start to develop driving skills. After winter I participated in track day event and was very happy with results - with this car I was much faster than earlier with more powerfull, lighter and more race type of civic. Maybe my skills advanced, but RTSi was so predictable at high speeds, that I decided to make a trackday car from that. Now it looks like this:


 So enough of these stories, and lets review the car. Engine: It had D16Z7 engine with S22 tranny (similar to Shuttles L3, but hydro and without SL gear). I planned to go turbo, but I had one think to worry about - transmission. S22 tranny is very rare, so the only choice would be to change it to cable L3 tranny, but it requires a lot of modifications. So I started to think how I can solve this kind of problem. One day I called to local junkyard and asked the prices of CRV tranny and engine. The prices were lower than I expected, so the fate of d series engine was clear. I bought everything I need to swap B series and in one weekend installed it. It wasnt bolt on, It needed to weld two mounts for tranny, make custom shifter cable, and of course shorten the propeller shaft. Later after some track day events I felt comfortable with that 140hp engine on a 1,3 tonn car and realised that I need more power to get better results. Car run just 16.2s 1/4mile and took 8,9s to 60mph. So I found cheap b16 head and arp studs. After ecu and cam tuning it ran 14.6s 1/4 and 6.6s to 60mph. Not bad improvement I could say.
  Setup at this moment: B20Z1 block with arp rod studs and oil pan baffle. B16A2 head milled 0.8mm with adjustable cam gears. Stock manifolds, 60mm exhaust, 76mm intake pipe. And also LPG system, because petrol is really expensive in comparison with average wage. Body: As I mentioned the body was damaged with rust, so I had to clean them, weld some holes and do the proper anticorrosion. Also I installed full vti interior, JDM 4gen prelude center console and double carpet for more silence. Sadly the exterior is quite trashy, because I have no practice in painting and I cant leave this car in paint shop for month as it was my only transport to work. Maybe in near future Ill manage to solve this.

 Suspension: 26mm front swaybar, no rear swaybar. Koni yellow adjustable shocks with way too soft weitec springs. All bushings changed to poliurethane. Front caster increased to 5 degree. Using Team Dynamics Pro Race 2 R15 7j wheels with BF Goodrich street tires 195/50.
  Brakes: Front 282 4x100, rear 260 4x100 discs. All parts are ATE manufacturer.
 And bonus surprise: One day I had a fun idea to experiment with exhaust manifold.
 It looks like crap, but the purpose was different: https://www.youtube.com/watch?v=-1AzVbjRUd8 Obviously this manifold was total crap in HP gains, so later I changed it back to stock. Plans for next season: Make it 100kg lighter without throwing out interior. Change rear diff to cast iron from shuttle and install OBX lsd in it. Change gears to H22 setup. Stiffer spring setup RD2 About month ago I bought new daily - 00' Honda CRV. Managed to find rustless one. It has leather seats (no heating
Comments
Any updates?
In fact there is some updates, but I will write about it when its done.
Just one photo as teaser.
To start with, I should mention that my old engine was in poor condition - it burned oil and on last month even started to play rod bearing 'music'. I was thinking a long time what to do next with this problem. The easy option was to buy another b20 block and change it, but a lot of them are already burning oil. Also this block is not made for performance aplications. Another easy option was b18. But they have same burning oil problem, and they are very expensive and hard to find im my region. B16 is quite torqueless engine, so for my heavy car it's a downgrade.
And one day I thought "hmmm... I wonder how much k series engines costs nowadays..."
Called a few junkyards and was surprised - k24 type s engines cost same price as b18 vtec. Of course, to do k-swap costs way more than just an engine, but I looked at it as an investment. K series engines are easy to find, are way more durable than b20 and the prices are decent. So if I destroy K engine, I can easily find another one and get back on track in no time.
So decision was made and one or two week later I bought it
It is K24A3. Same engine as K24A2, but it is for europe region and is rated to 140kW. They are cheap, they are durable (beefier rods, piston cooling) and have lots of torque.
Next must to buy was k-pro III
Also I managed to find used OBX lsd, which I will install to another rear diff.
Not a must for k-swap, but decided to try gel battery. 11Ah, 210A. 3.3kg
One week later managed to find 2gen crv gearbox for cheap.
And then I noticed, that transfer case havo no stiffener like b20 box. So I started to think what can I do about it.
Decided to make alluminum bracked, that holds transfer case in three points.
Firstly made an example
Then made a CAD and got it cut from 8mm allu. Unfortunately they had no 12mm at that moment, so had to choose just 8mm material.
Made steel brackets to block.
All assembled
In the process I discovered, that d series headbolts can work to mount the transfer case. They just have to be shortened a little.
Next thing to do, was intake manifold. K24A3 manifold has drive by wire TB, but I wanted cable operated TB. Cable TB doesnt fit K24A3 manifold, so I bought K20A2 mani. Then I saw that K20A2 manifold is a little different by mounting surface.
K24A3
K20A2
So I decided to make a hybrid manifold.
Mounted them on sample, welded and resurfaced.
Next thing to do while engine is not in bay - intall a 50deg VTC. And adjust valve lashes.
After some sidequests and one weekent of measurements... BAM!
All the 3 mounts are homemade because of two reasons. The aftermarket ones are realy expensive to ship in my country, and they wont mount engine just like I wanted. Why? because I wanted to have a good oil pan clearance. For that reason I had to move engine forward and rotate it a little because of the transfer case, that is very close to steering rack.
Also the rear mount is very different than aftermarket ones.
Welds looks ugly, but it should be strong enough.
And all that effort was for that view.
Next thing I noticed, was axles, because b series were way too short
Luckely I managed to find set from RSX Type R. They are perfect for this swap, just the inners have to be swaped, and outers changed to b series.
Another important thing - shifter.
I used Accord Type R H22 shifter, with primary cable. Secondary cable is from 1gen crv, that is moded, to fix the length issue.
Also, for safety reasons I relocated fuel filter.
Then I mounted stock Civic EP3 radiator, I noticed how tight everything in the front will be.
So had to change stock fan to slim one. And had to made this anaconda.
But after all this suffer finally got to this
But there was one more issue
So had to make some temporary fix, because I really wanted to test this engine at this moment.
https://scontent-vie1-1.xx.fbcdn.net/hphotos-xtf1/v/t1.0-9/13001189_579045458922674_7601556921829425494_n.jpg?oh=84c9d930b28742d843dcf09aca45112d&oe=57B9273F
Next things to do:
1. Most important thing - fuel surge tank. Fuel tank has big tunnel for propeller shaft, so then I turn left all fuel runs in one side there is just secondary pump. Main pump gets no fuel and the engine gets fuel starvation. Till now I had to drive only with full tank, that is unsafe and gets aditional 25-30kg of weight.
2. Tune up the ecu. Now I run base TSX calibration file with 10% fuel enrichment.
3. Solve the hood clearance issue. The P/S pump will be relocated in AC pumps location, and I need to think there to relocate stock fuel pressure regulator. After that the engine hood should require only slight rise in engines area.
4. Get rt4wd system done. I decided to change old intrac diff to cast iron wagons with OBX lsd. Ill mout it in the middle, fabricate axles from d series sohc long axles, use crv hub bearings to adapt front cv joints, change propeller shaft u joints and make it fit in my setup.
Fun fact: k series gearbox transfer case ratio is the same as civic wagons, so I should have no issues using wagons diff.
5. Then the propeller shaft will be in place, I will be able to fabricate custom exhaust system. There is one problem: manifold should be two piece unit, because it can be installed/removed just from top, so it shoud disconect somewhere near transfer case.
6. Also, I started to think about aditional downforce for rear end, because with this engine speeds will be much higher and I dont like to slide sideways driving 140km/h and more.
My daily driven CRV also should be happy about this k-swap, because it will get all the leftovers from rtsi: b16 head with arp studs, p28 ecu, rear intrac diff and maybe more stuff.
Soon there will be more info.
Lets start chronologicaly:
The fuel surge tank was installed. I used 1l tank and external Audi fuel pump. Dont mind the wirring, it was test ride.
Next one was the gearbox. One night after some launches I noticed, that I dont have 5 gear anymore. Gearbox made strange noises from the begining, so I thought that this was the result of it.
I bought Accord 6speed box, with intention to shorten crv box and add 6th gear. I dissassembled my broken box and couldnt find that was wrong with it. So I hybrided these two boxes and hoped for the best. After assembly box was working fine, but noises were the same. For anyones interest: crv gearbox has the same FD as Civic or RSX type r (5.0xx), so combined with Accords gears it resulted in realy short gearbox.
Few days later I launched the car a few times and noticed, that I dont have 5gear again... and in some cases the 3th dissapears too. That seemed suspicious to me. I checked the engine mounts, and found out, that rear mount was teared and sudenly everything started to make sense: with broken rear bracket the engine changed its angle and the shifter assembly started to hit air intake some times and poped to the neutral.
After about 4-5 hours of work the rear bracked was improved.
As you can see, its 3 piece unit, otherwise I wont be able to remove it without cuting it.
Next I started working on 4wd system.
I wanted to change my Intrac diff to wagons with OBX helical LSD, because helical LSD is torque sensing and Intrac's viscous LSD is speed sensing unit. Torque sensing LSD is better in handling, because it starts locking when you push gas pedal and distribute more torque to wheel with more traction.
But before instaling OBX LSD I wanted to check its condition. I opened it and found this:
So, I decided to grind that defects and all sharp edges, to prevent any future debris, from that low quality housing. Also I ported the oil channels in it.
Gears were in good condition, so I left them as they are.
Assembly process
Assembled unit
I had to dril taped holes in LSD housing, to be able bolt gear crown.
Next - shimming diff.
I used factory shims, that were machined to make good diff position and bearings preload. Problem was, that one shim was machined about 0.5mm, and after that another shim was too slim. But I found that rear wheel bearing clip was very similar in diameter, so I used it as additional shim.
Shimming process
Rear diff done. Now we need to prepare everything for bigger axles and CV joints.
To fit front D series sohc inner CV joint you just need to grind some material from diff housing.
To fit front d series sohc outer CV joint it is needed to make a lot more modifications.
Take factory wagons rear hub.
Cut the outer bearing "cup" and grind inner hole that it would be able fit with CV joints housing.
With bolted CRV rear bearing
To fit CV joint and outer hub, you will need to grind some material from CRV bearings inner and outer 'lips'.
Fitted with outer hub
After I mounted the new hub setup on my trailing arm I noticed that the hub's offset is a lot narrower than factory's. That is issue, because I cant fit rear calipers as they contact with trailing arm and shock a lot. Luckely I noticed, that factory hub has spacer for drum housing.
So I used it as spacer for my hub assembly.
After increased offset there was another issue: rear inner hub had to be grinded to fit CV joint
The preparation is done. Now the axles. For proper axles length and prop shaft placement I had to relocate rear diff to the middle.
After that I needed to use two d series sohc long axles to build two eaqual length rear axles (used 57cm axle length).
Lets get that mounted on car:
I had to fabricate new brackets for VCU carrier bearings.
Next - the exhaust system
And now, the test drive!
...
After first launch I realised that VCU isnt working properly, and in higher speeds prop shaft is vibrating. Thats a dissapointment...
Luckely I had a spare VCU. I unmounted that broken VCU and saw why it is broken.
Some one ruined it with some kind of tool. You can see, that even the oil seal is damaged. That explains why it is not working.
With another VCU the fun started to begin
So, the only issue is vibration from prop shaft. Ill have to get it to repair shop. It needs to change all u joints and final balancing. It will cost quite a sum, but there is no other choice.
Also I noticed, that the engine is a little too high for prop shaft, so later I will make it 1-2cm lower, for better u joint angle.
And for my daily CRV... it got b16a2 head, with intake and exhaust system. Now it runs much better.
I've got the same rear LSD to chuck into the rear wagon dif, apart from drilling out the tapped holes, did you find any other issues?
Keep up the good work!
Thanks! Ill try to write everything as detailed as possible, but there are so many details and issues that in most cases I forget about them. If anyone is interested in any of my written mod feel free to ask.
With rear LSD mod the only issues were drilling tappered holes as you said and reshimming diff properly. Also you need to press new bearings on new diff and to remove some material from crown bolts as they can contact the diff housing.
---
Ok, I think it's time for another update.
After testing 4wd setup I noticed prop shaft vibrations. There was two choices: take prop shaft to machine-shop and let them do all the work, or try to do some of the work myself. Because the first option is very expensive I choosed the second one.
The main thing about prop shaft that it needed new u-joints. In my region there is no option like rockford u-joints with clips, so I had to find another ways. Luckely I managed to find replacement u-joints for crv type and for shuttle type u-joints. The only issue, that they dont have any fixation.
After some other investigations I solved this issue.
Removed u-joint (quite a hard job I should say)
Made a primitive u-joint alignement bench. Because u-joints have no fix points I can fix them off center, so I needed to be sure, that this wont happen (in about 0.2mm tolerance, that should be enough).
Finished product. As you can see I used old u-joint caps, which I spot-welded to fix new u-joint in place.
After the most expensive work has been done I took prop shafts to machine shop for final length tune and balansing.
Why two prop-shafts? Because winter is coming.
---
Also I had another issue with my new rear hub setup: the old brake bracket didint fit. Because of different bearing housing and offset I had to weld bracket straigth to the housing. There was no way to make removable bracket.
---
Another issue this car had was too little front camber. It was about zero, so I decided to tune it with home made methods.
I shortened upper arm about 15mm. Also I pushed joint backward for aditional caster. Also I tilted it, so the joint should'nt bind from too much angle.
I got about 2.5 deg camber and 6-7deg caster. I tried to get 1.5-2 deg camber, but oh well...
How 6-7deg of caster looks like.
---
All these issue fixes and mods were a preparation for a trackday event. We have quite a scary track, so take a look on on-board moments.
You can even hear on video, that I have another issue - tire srubing/hoping on hard cornering. I think its from soft springs and stiff swaybar setup. Soft springs cant hold so much mass on corners and causes huge bodyroll, but stiff swaybar tries to prevent it by connecting both front lower arms, so we could say that it increases suspension dependability. On hard corners with big bodyroll inner wheel releaves and outer compresses, and all the bumps and relief inner wheel gets is send to outer wheel via stiff swaybar and disturbs its grip with all the judder. So to sum up - I need stiff springs.
---
Ok, I think its time to explain why I made two prop shafts for civic. As you can see one shaft is with VC unit, and another is solid. 4wd is fun in winter, but in high speed drifting its quite dangerous, because it requires much more speed than rwd cars. In short - rwd is way more fun than 4wd. And the handling is way more natural, then front wheels are freed from axles.
Of course, nothing in 4wd system is projected to hold all the power from engine, so it would be totaly normal if something would brake. And after about month of rear tires abuse it started to make strange noises and I found two new issues.
---
Issue number one.
As you can see the diff mounting frame was cracked. It cracked when it was in 4wd setup, but I didnt managed to find this problem.
Also I noticed, that diff was not stiff enough. Although I filled rear mount with poly adhesive and used poly bushings on mounting bracket, the diff moved enough to smash into fuel tank.
There suposed to be about 2cm space...
The fix for this issue was quite simple:
Cut the rusty frame.
Using 60x60mm 3mm thickness square pipe form new frame and mounting bracket.
Also I used m14 bolts to fix diff bracket to frame. Factory version have only m10 bolts.
I removed rear diff mount, and fabricated solid fix point to prevent diff from moving at all.
---
Second issue:
The OBX lsd didint hold for long. Two tooths broke apart, but somehow didint damaged the other gears.
This time the solving process was also simple.
Also I welded a safety cover, to prevent welding debris from falling on FD gear and locking the rear wheels and causing massive accident.
---
Also there wase some side job - to find the replacement for my burned Ford Focus RS rear muffler. I managed to find muffler from Mercedes Benz CLS AMG 5.5l
After welding in.
Unfortunately the sound was not that I expected.
---
Well well well, would you look at the time, its burnout o'clock
---
Some final thoughts. If I made all the ~240Nm from engine to go to rear wheels and none of the rt4wd parts broke down on fifth burnout... that means that it is possible that 4wd setup can hold 500Nm or even more. That is quite tempting.
Thats all for this time.
How did you go get the left and right caster angles to match? I can imagine jigging them would be difficult.
Love your fab skills and 'get it done' ethic!
Thanks!
non VC prop shaft was from rare shuttle intrac, because it had small u-joint flange on one side, and old big u-joint flange on the other side. I had to change flange sides and shorten/leghten each side to make it bolt on for existing setup.
In fact the caster angles does not match (one wheel has 6deg, and another has 7deg), but it can be easily cured in my setup, because I used caster shims in lower control arm earlier. So I can remove some shims and make both wheels to 6deg.
I would love to hear more, too bad this discussion died? :c