503Wagovan's Build Thread
So my girlfriend and I have been looking for a wagovan for sometime now and finally found one. needs some TLC but were in luck and i happen to be a body/paint tech  We are by no means new to the honda game. I owned an S2000 for a while and she has had her 2000 Civic Si for many years. She was featured in superstreet magazine a while back. Here is the link,
http://www.superstreetonline.com/featur ... index.html
Anyways. Were not totally sure what we want to do with it. The 4WD conversion has passed through our heads more than once believe me. Living in the Northwest of the United States, 4WD comes in handy.
Well its time for the work to begin. Actually I have already done a lot of work, this is just a catch up to my current state of rebuild/restore our wagovan. If you have any questions or suggestions feel free to post them up!
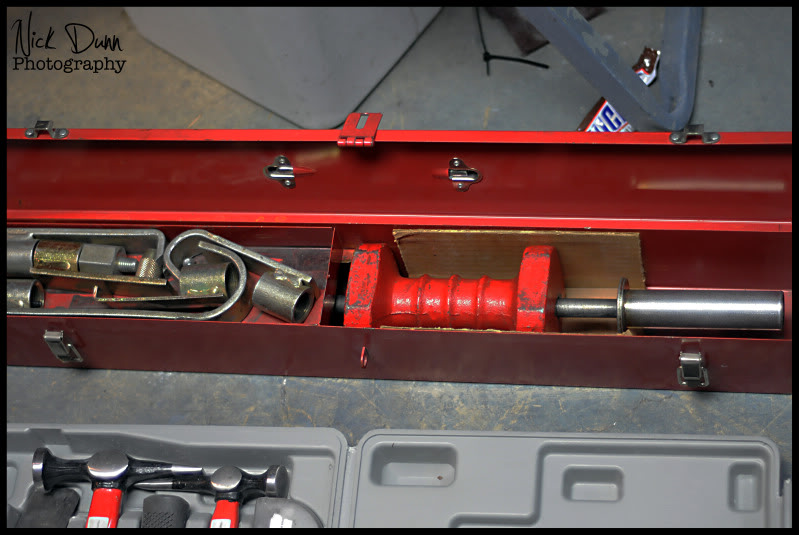
Once we got the car home. we tore it all apart and went to work. First and foremost..the most important tools for pulling a front end and getting it straight.
Slide hammer.

Bodywork kit. Hammer and Dollies.

Now it was time to pull out that munched side. Hook up the slide hammer to the munched side and start pulling.

once i got it pulled out...i found shittyness....Tear in the metal.

Welded it up. Took two welding sessions but i got it cleaned up and flat.

Added a little bit of body filler to make it smooth.

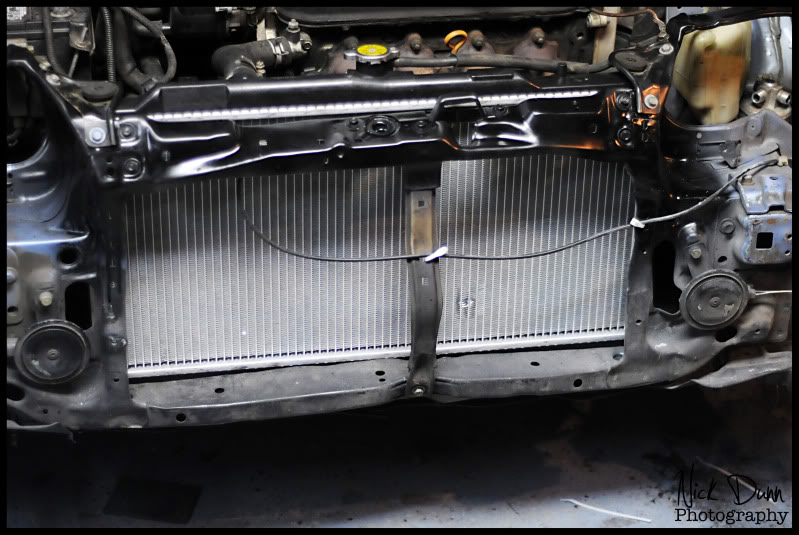
Sanded the front core support down really quickly and just shot some black paint on it to keep anything from rusting. When i finish building my other motor i'll paint the engine bay and make it clean.

Got the radiator installed and bolted in. Put the coolant in and started him up. NO OVER HEATING!!!!

http://www.superstreetonline.com/featur ... index.html
Anyways. Were not totally sure what we want to do with it. The 4WD conversion has passed through our heads more than once believe me. Living in the Northwest of the United States, 4WD comes in handy.
Well its time for the work to begin. Actually I have already done a lot of work, this is just a catch up to my current state of rebuild/restore our wagovan. If you have any questions or suggestions feel free to post them up!
Once we got the car home. we tore it all apart and went to work. First and foremost..the most important tools for pulling a front end and getting it straight.
Slide hammer.

Bodywork kit. Hammer and Dollies.

Now it was time to pull out that munched side. Hook up the slide hammer to the munched side and start pulling.

once i got it pulled out...i found shittyness....Tear in the metal.

Welded it up. Took two welding sessions but i got it cleaned up and flat.

Added a little bit of body filler to make it smooth.

Sanded the front core support down really quickly and just shot some black paint on it to keep anything from rusting. When i finish building my other motor i'll paint the engine bay and make it clean.

Got the radiator installed and bolted in. Put the coolant in and started him up. NO OVER HEATING!!!!

Comments
then i pulled the carpet out so i can give the whole inside a full detail.
Check out my effed stereo wiring....FML
Gonna clean the seats and carpet tomorrow. Lets see how well it turns out.
carpet came out SUPER clean.
and here are the shots of the outside of the car...just a couple. The front end still doesn't fit quite right...little more tweeking to do but i needed to get it bolted up since i needed to drive the car lol.
once we got the harness soldered and wrapped in tape, we started running wireing for the amp/sub. Ran the power wire through a plug in the firewall that was unused. Dont have a picture of this because it it literally buried down low on the firewall and up behind the heater-core under the dash lol. started running the rest of the wires up behind the glovebox and down the passenger side of the car and under the seat where the amp will be located.
Once we tested to make sure the amp had power and a solid ground (grounded it to one of the seat bolts) rant he wires back to the rear for the sub. The amp is a 450watt alpine amp. Borrowed the sub from starla (my girlfriend), 12" W6. once everything was wired up installed the head unit and turned it on.
Wagovan now has booms.
today i pulled down the drivers corner of the headliner and sealed up that corner of the windshield that kept leaking onto my leg while driving lol.
little bit of urethane and i hope its sealed up.
Hopefully this fixed my leak. im going to check around and make sure there are no others before i re-install my clean carpet.
durty wagon.
i like where this is going...
thanks. yeah the thing was pretty filthy and moldy when i got it...fun cleanup, not.
Me too!!! i'll post up my flickr in my sig.
I'm looking for the OEM dash clock like yours, lucky!
whats the difference if i might ask? didnt realize there was.
Great job on your car so far btw. Glad you sorted out your stereo stuff too.
i dont know about the dash clock, it was in there when we got it. As for the wagovan/wagon comment. Everybody i've ever known in the honda game calls them a wagovan. No matter the year? maybe were all wrong? i have no idea to be honest. i've been reading up and researching all day long on this forum since i have zero experience with EF anything lol. Hopefully i learn fast and if infact i am wrong and its not really a wagovan, i'll get my name changed and edit the posts!
So the RT4WD isn't a Wagovan and vice versa - two different models
Honda Civic Wagovan
Honda Civic RT4WD
Honda Civic DX
Honda Civic LX
Honda Civic EX
They are all different trims (or models) - the Wagovan name is actually the model, so the RT4WD isn't a wagovan.
really have not decided what we want to do with it yet. I've got a D15block and a Z6 head that i had plans of doing a minime build with, may just slam it in the wagovan and go with it. Also had thoughts of doing the 4WD swap and playing off-road with it. honestly its really in the planning stages.
thanks for the explanations on the naming..i think im still gonna call it a wagovan.
It's like knowing these are actually EEs and not EFs- you'd have to own one to know the difference.
Thanks for the final clarification. I appreciate the details!
eh, sorta true..
Wagovan = BASE, i believe no clock, vinyl seats, no split rear bench, etc.. 4th gen models only made from 88-89
DX (or, sometimes referred to as simply "CIVIC WAGON" in the manual)= "deluxe", cloth seats, split bench, basically everything that was available (besides dealer installed access, of course) funny thing is the DX WAGON had more features then the DX sedan and hatchback, for example, a Tach (Wagovan also had a Tach)
RT4WD= same comfort features as DX, except with 4WD of course and all things pertaining to that. added features were power steering, rear mudflaps, and body colored bumpers. 89-91 also had the larger white wheels. some rumors state they also had larger brake calipers.
LX, only for a sedan and had power everything.
EX, same as LX except with more powerful engine, bigger brakes, bigger wheels.
hope this clears things up.
overall, WAGON models were quite different in their "features" distribution when compared with the hatchback or sedan.
when people refer to all wagons as "Wagovan" they are indeed politically incorrect, ha, however it seems to be more of just a nickname that stuck to all models.
threadjacking finished.
this build looks awesome! like to see where this is headed.
any S2000 pics?
I didnt really do much to the S2000. Just a mugen front splitter/lip. Had plans for lowering and some gold wheels but ended up getting in trouble in the car and sold it. Oops. Was white with black/read interior. I'm actually pretty sure my gf was more pissed that I sold it than me. Is wake up in the am to the S2000 gone and her keys on the stairs.
Anyways. Back to the build. Were focusing mostly on interior and general maintenance as I drive the car everyday. Should get more work done on it this week. I'll be sure to photog everything as well as update anytime we get something done.
Got my HID's in the mail friday night. Of course i went right to the garage to do the install. Did them by myself so there is a lack of photos but i did what i could when i remembered lol.
i picked up 3000k for the Lows and 10,000k for the highs.
Pulled the front bumper off and had to figure out where to mount the ballast....decided on here.
If i was smart i would have done this install when erik3 brought me my new frame ends/bumper mounts...but im not cuz its a new part and of course it must be installed now!
then on the passengers side i ended up removing a chunk of the stock intake...useless plastic.
now i have an empty space to mount the ballasts on this side too.
now i have TWO ballasts to mount so i ended up just tying the second ballast to the back of the first so they are both in the same spot. seemed to work perfectly. forgot to take a picture of them all mounted up so i'll do that when i do the frame ends/bumper mounts. No pictures of the lights on yet. havn't had time to snap any with the D300s..and iphone pix wont live up to my D300s only photos for my build thread lol. I'll get some ASAP....im gonna need to pick up some fog lights to set off the headlights as well.
Me too! Also just bout some blue speaker pods for my rear speakers. Picked them up from...damn Fogot his name here I'll edit with his name when I get home.
thats what I'm shooting for. kind of working from the inside out for starters. Seeing as its a daily driver i'd like to get the inside nice and comfy before i start any serious bodywork.
well i just read your 2000 si article and you live in the hillsboro area? so do I haha. sick.
What do you live by?