Will's RT4WD Wagon Resto from Australia!
**Moving my build thread on my Honda RT4WD Wagon from Honda-Techto here! Enjoy!**
Yo! So I've been in the old school Honda game for over 4yrs now with my track/street built hatch ([url][/url]https://honda-tech.com/forums/honda-crx-ef-civic-1988-1991-3/lunchbox-3251019/) and I've now picked up a new project, a RT4WD Wagon! Plans with this some what barn find which has been off the road for 9 years is to restore it, make it look shmick, and slap a SOHC VTEC motor in it and turbo! I've always wanted to do a SOHC Turbo build, and which chassis would be better than a 4WD wagon hehe. Here's some starting photos for the old girl, bit rusty around the window but apart from that the rest of the chassis is somewhat clean!
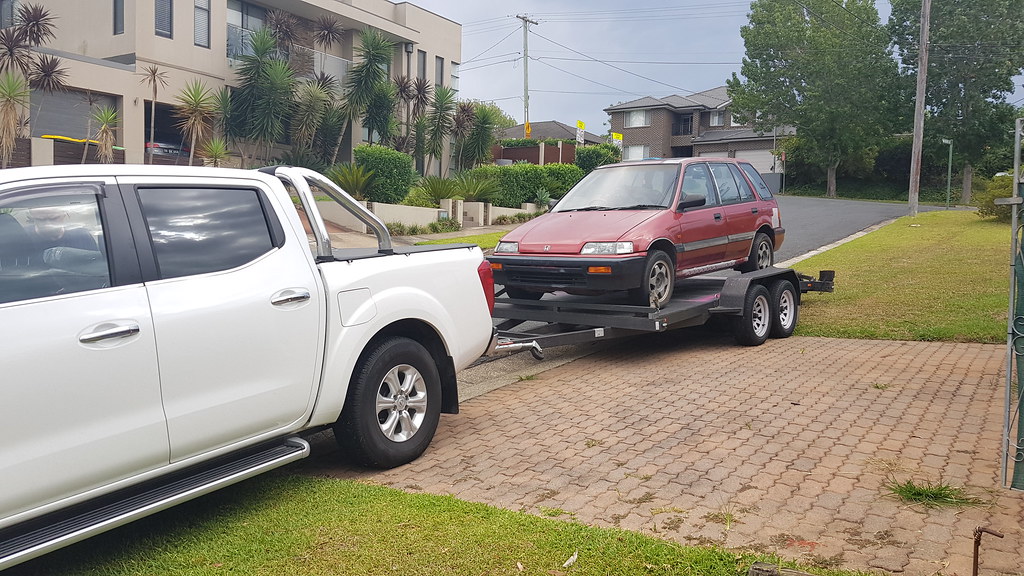
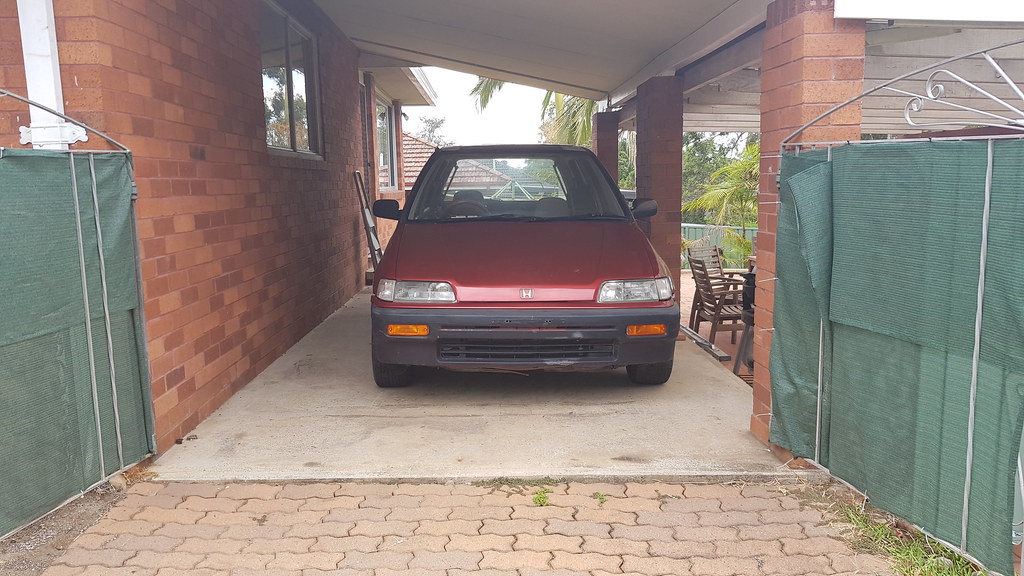
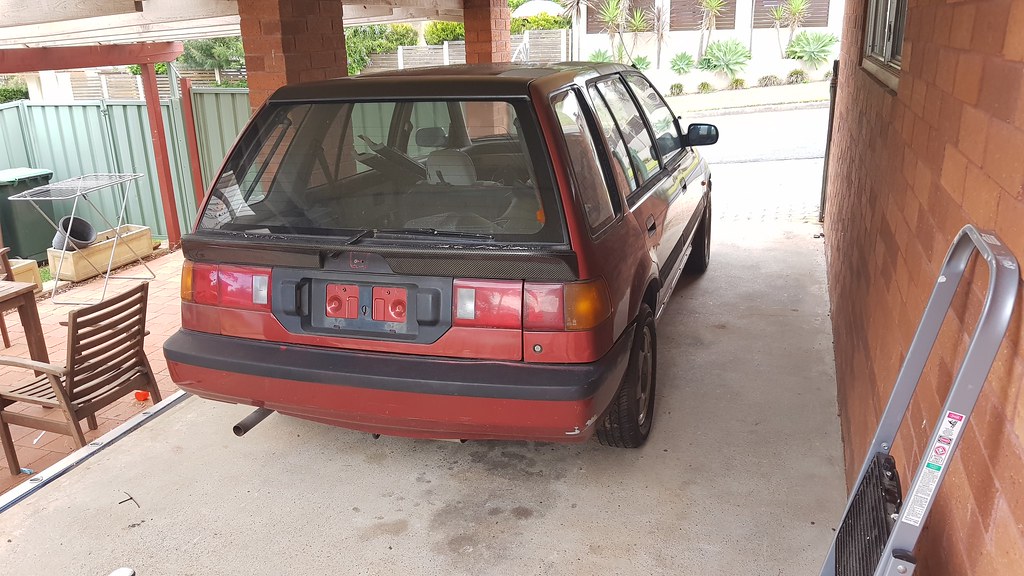
Yo! So I've been in the old school Honda game for over 4yrs now with my track/street built hatch ([url][/url]https://honda-tech.com/forums/honda-crx-ef-civic-1988-1991-3/lunchbox-3251019/) and I've now picked up a new project, a RT4WD Wagon! Plans with this some what barn find which has been off the road for 9 years is to restore it, make it look shmick, and slap a SOHC VTEC motor in it and turbo! I've always wanted to do a SOHC Turbo build, and which chassis would be better than a 4WD wagon hehe. Here's some starting photos for the old girl, bit rusty around the window but apart from that the rest of the chassis is somewhat clean!
Comments
Alrighty so last weekend I got around to just cleaning everything out, gassed the entire car with bug spray as there was spidery cunts (juicebox reference) left right and center! Cleaned out the boot too and vacuumed all the dog hairs out. Also removed front seats as under them contained more spidery cunts too..
Now onto the fun stuff, RUST... Both top corners of the engine bay under the crowl contained some nice looking holes, the left hole on the right side actually goes under the windscreen.. Started poking away to get rid of the big sections of rust but still way more to come out. It's definately a windscreen out job, but for now I'm considering just laying down some rust converter so it can't grow anymore. Not sure when I'll actually remove the windscreen to do all but sometime this year
So finally got some free time to work on the wagon, the university semester started 2 weeks ago so hopefully I still have spare time in the coming weeks to work on my rusty wagon! Started with mving my brothers drift car out the garage to put the wagon in, as I'm going to be drilling the roof off we feel it should have some lovin in the garage, as oppose to under the carport. Taped up the front window, ran a big stanley knife (razor) around the inside of the windscreen to cut trhough the sealant and she popped out with ease. First time removing a windscreen and boy was I impressed! With the windscreen out we could see the extent of the rust damage under the window and to be honest, it's not really that bad. I think the best way to repair will be to just weld in new pieces of sheet metal. Was considering using bits off a sedan crowl section but unfortunately they are different sizes.. Anyways cleaned back some more of the rust, cut the section off on the passenger side where the bonnet mounts go as that was completely rusted..
Previous owner had a 'proper' panel beater repair some rust around the rear passenger tail light many years ago, considering the priming job he did spraying half th car in primer I could only assuming it wasn't done correctly. Decided to remove the tail lights and rear side plastics and what do you know, more rust. Because they primered it but didn't paint over it, the primer just absorbed moisture and I guess where they repaired it the water just attacked again. The first photo below is the drivers side which actually has no rust, but is somehow dirty and i don't know what.. 2nd photo is the passenger side where previous rust has been repaired, you can see where they've caked the sealant all on the inside, over board.. and now rusty water has leaked through (I'll get another photo on the other side of this, i forgot..) but to top this off, the water has run down into the tub section behind the rear wheel from this leaking and rusted out the bottom as you can see via the 3rd photo.. yeh... holes in that section left right and center, inner and outer skins too which makes it even better to repair.. But staying positive, once the rust is repaired I'll have a rust free wagon!
DATE of original upload: 31-03-2018
Long Easter weekend means time for some wagon lovin, we decided to go ahead and cut out all the rust on the crowl so we can start making templates to then cut 1mm sheet metal up to weld back in. Not much to say here, each of the 3 sections I've taken before and after shots of so I'll just list them below. First we cut out the big chuncks with the angle grinder then fine cut it again, on the drivers side we had to use tin snips to get into one or two tight corners, they worked very well. Then once the cutting was done, filed down the edges to prevent after hospital trips and then wire brushed the rest.
Also for any of you 'rare' Honda EF Access part nerds out there, is there any knowledge whether this arch trim is a access part or just a random thing someone did that happens to look OEM? Theres one on each arch. Cheers in advance!
DRIVERS SIDE:
BEFORE:
AFTER + TEMPLATE:
MID SECTION:
BEFORE:
AFTER:
PASSENGER SIDE:
BEFORE:
AFTER
Been a while since the last update, that's because not much has really happenedd until last weekend. Been busy with the uni semester and work, 2 weeks left of uni and then I'm done for this semester so I can focus a lot more on the wagon build!
Two recent purchases for the wagon is a minty fresh EF5 JDM cluster I bought from Yahoo Auctions, will be a nice addition to the build. As well as this, I managed to find a super rare set of Honda Access heated mirrors for a EF5. I've never seen these before, barely any info on the internet too. I plan to try and swap the base plates over to the wagon ones.
Upon sussing the roof we found some more rust at the back. Not sure if I had mentioned above but we are planning to drill the roof off as both sides of the chassis and roof skin where they are spot welded is completely rusted. Once it's drilled off new strips of metal will be welded back in. I had a mate wrecking a ED sedan so I took the roof in case we can use pieces from it on the wagon roof. Also scored the power window setup and the door cards are a direct fit!
Last weekend we finally got around to taking the roof off, drilling out all the spot welds was interesting. The whole drivers side of the roof was rusted so we just pried it upwards and it quickly came lose. Upon getting the roof off we came to realise it actually isn't too bad. Chassis side theres 2 layers, the top one on the drives side is mostly rusted away, however the under piece is still good condition just needs a wire wheel and she's sweet. All of the passenger side apart from a very small section at the rear is fine, just some surface rust. I'll spam a ton of photos, the order of the photos is from the rear of the car ->passenger side -> front -> down drives side to the rear. I'll also then inclue photos of underneath the roof skin.
So, with the roof now off I ca start cutting out the rust, as which I started doing so for the drivers side on the chassis, cutting the top piece off. However, you may have seen in photos previously but above the drivers door there was some primer, I always wondered why it was there. Then I realised there was bog at the top of the roof there.. Hammer, chisel and a wire wheel soon enough revealed this.. Our guessing is something like a tree had fallen on it before, Or someone tried breaking into the front door as the top of the door frame is bent, prying off the roof of the car. Someone has tried to repair it before but like the rest of the fucking shit repairs on this car they did a shit job. I'm quite annoyed, it will push everything back but oh well thats the joys of it. I'll fix it properly and then continue with the roof.
Here's a happy photo os each of my ED chassis (I need a CRX now don't I
DATE of original upload: 26-06-2018
Alrighty time to start tackling the rust on this roof. Uni exams are nearly done so I was able to fit in some time, one more exam this Friday and then freedom! ... until next semester.. My dad runs a warehouse whom supply 3M products and other products to other warehouses like DHL/TOLL, Quantas and other buinesses, he brought home these rust remove wheels, they are bloody awesome! Got rid of heaps of surface rust from around the chassis roof where the roof skin sits on. I also cut out the remaining rust on the drivers side. Once it was all off from these grinding wheels and also some wire brushing, I wiped on some WD-40 as a panel beater mate informed me to do, so the clear metal won't corrode again. Then I started working on the roof skin side, passenger side came clean very quickly however the rust got under the webbing supports, so they will need to come off as well.
Progress time! Got a nice big 1200 x 1200 piece of mild steel sheet which we will use to patch up all the rusty goodness. Started with the chassis side on the roof section, a few posts above we cut ut the bad rusty bits as the rest was only surface rust. We needed to replace a smaller section on the lower piece (chassis side theres 2 layers, with the roof skin then sitting on top of that) so we cut the smaller piece accordingly. Next we then had the upper piece which ran from the back of the rear door to the front windscreen. Towards the front the chassis actually curves outwards (can see in the pic below) so we decided to do it in 2 pieces, can see faint scribe markings where we cut it on a curve to follow the shape required. Nothing actually got welded in today, remembered last night at midnight I needed weld through primer and the shops that would stock it were shut today (Sunday) so welding will occur next weekend.
Next up was one of the 3 holes under the crowl. This section was the one which actually rusted under the windscreen. Theres a step in the factory metal with a radius where the windscreen would sit. I don't have access to a sheet bender so we improvised, to be honest it worked perfect. Used a block of wood and hammered it on the corner so it bent on the crease (does that make sense?) and yeah. Little bit of fiddling around but we got it to this shape. We decided it will be easier to tack it in from the top the slightly bend some sections in the lower bit for a perfect fit.
Last piece we got around to today was a second out of three holes under the crowl, the one passenger side where the hinge goes (probably the trickier one). After a 3 hour proscation chat with a old childhood mate/father who came over to see how rusty rust could be, we got around to this. Not fully complete, ummm'd and arrrr'd over a few options and decided to go with 2 seperate pieces as oppose to one, as theres too much bending and yeah, ceebs. Used some engineering tools (paper) and started folding around to get a rough shape of the lower section, it sits rather flat. We will then have the upper angle piece weld on top of this. Also had the right hand side piece 30mm longer so we could bend it up the side of the chassis and fold it over (looks like it was the same from factory)
Have made some good progress lately, other weekends have been taken up with prepping my track hatch ED for Honda Nationals which was a few weekends ago, now it's full steam ahead with the wagon!
First off I'll start with what I bought, another wagon! As I've said before the RT4WD Wagons are very rare here in Australia, currenty we only have like 30ish accounted for? Apparently 100-200 were sold in Australia, and somehow I found one which was a paddock basher, been painted by the kids and yeah, nothing like some 'honda' moss growing on every panel. The owner kept the RT4WD system apart from the gearbox (no idea why) but I still bought it. Sun roof isn't cracked, good interior pieces and panels we can use to repair my rusted sections. Once we got it home the stripping commenced over 2 days, pretty much gut EVERYTHING from it and store for spares. Once the roof liner was dropped I could check to see if the roof was rusty like my maroon one and guess what, it's not on the sides (rear was a little rusty, same spot as maroon one, not as bad)! So we went about drilling this roof skin off as well, however as we don't need to reweld the spot welds, we just drilled straight through them with a normal drill bit!
Photo dump incoming
A few of my latest Honda Access purchases for the Wagon, I also got a pair of Gathers rear speaker pods from Japan, the holy grail of my slowly building collection!
Honda Access EF5 floor mats! MINT Condition!
Honda Access Air Refiner, works well and lights work too!
Gathers rear speaker pods for my hatch!
Onto some actual progress on my wagon. With the metal strips we had previous cut for the roof support chassis side, and 2 pieces for 2/3 of the rust holes under windscreen, I sprayed them in weld through primer to protect the metal from rusting. With this sheet metal, as with any bare metal, once your fingers touch it, the oil on them attracts rust straight away, so best to clean the pieces off once they are finalised with some degreaser and then paint to protect from surface rust.
Next I slapped some weld through primer onto the first rust hole we were going to weld our new piece into, the middle peice of the crowl which previously we bent the metal different ways to try and following the OEM design. The piece was then held in place via a magnet by hand by my father whilst I went around it tacking to the chassis. Our plan was to continue bending it in different angles whilst tacking it for the perfect fitment. With it tacked into position I then went around it to weld it fully. Here I tried different methods I had researched, welding normally and trying 'stitch' welding when you weld 1 spot quickly, almost zapping it, then move down 1mm and do again etc. Whilst doing all this we were fiddling around with the welder settings to try see what worked, going on some of the angles one or two sections blew through as well, but was easy to patch up the hole.
With this done we cracked out the grinder and started grinding down the welds to be flush with the chassis by using a flappy disk. A good majority of it was done, I'd say 90% with a few mini holes I need to go over again to completely fill (I still need to do this to this date, will do next weekend). Considering neither my father or I have done panel beating before we were quite impressed with our work, so have bent the metal into shape and to see it welded in there faily smooth, it's a good feeling. Only skill sets for this was my dad did his apprenticeship when he was a teenager in the UK as a fitter & turner, learnt to weld somewhere along the line, and me learning to weld in highschool and continue with exhaust jobs at home. We look forward to doing the rest of the panels!
And now this weekends progress!
Time to address the dent I found underneath all the bog between the front and rear door on the drivers side. With the spare shitty wagon I bought we decided to cut the damaged piece area from that one as it was mint and weld it onto my maroon one! So we marked out roughly what we needed, then added some extra length to be safe, drilled out the spot welds and cut each of the 3 sides and off she came, with ease!
Now it's time to cut the piece off my car, this time obviously needing to take a bit more care.. Same process as before.. Once it was off it revealed the damage behind, luckily it was all surface rust which was easy to remove. It looks like previously they possibly tried to pull the dents out by welding something to it, but that ofcourse rusted from behind..
With the chassis piece off we placed it over the replacement piece to mark out what we actually needed, and obviously leaving a little extra to play with. Then back and forth with the grinder slowly shaving down each side to get a good fitment with about 1mm gap where the welding is required and wallah we have a replacement piece ready to be welded! Slapped some weld through primer over the chassis side and back of the replacement piece.
Welding time, started with the sections that would be above the doors,* either side of the section cut out those areas move freely as we have preivously cut out the inner sections which holds it down, so if we match these panel lines up we can push it down for correct fitment with the spot welds, hard to explain if anyone is confused lemme know I'll draw on the photos to show what I mean. I then moved down and did the sections in the door jams tacking it into place to ensure the panels were level to each other, with this done we moved onto the spot welds in the door jams too. Bolted the drivers door back on to check the fitment, spot on!
*
With everything tacked up and looking gucci I went ahead and welded it all together, the sections inside the door jams were a little tricky, somewhat welding up above my face on an angle, the weld pool was at times running down too fast, but got it done. Then back to grinding it down flat with a flappy disk, then using a special pad my dad got from his work, its like a cloth disk for the final fine details. We were able to get it very smooth, probably going to need a small amount of body filler for a perfect shapre but we are very impressed with our work. I was able to stand on the door sill, hold onto the section we just welded in and yank back on it, didn't move at all! Finished it off with some primer to protect the metal until I body fill it before paint!
With the final few hours of daylight for the weekend, the insider section of where we just replaced the dented bit I sprayed with weld through primer. Previous posts I showed were we had to cut out the upper and lower folds of the metal which the roof skin actually sits on top of, obviously because it was completely rusted out. I tacked and welded in the lower piece, I must say it was an absolute @$^!@#% trying to weld it in. Upside down, nothing wanted to cooperate, eventually got it done after playing around with the welder settings, found it best to crank up the powa and just hold the weld pool a bit, defs not as much as I would do on any other panel, but seemed the only option.* * * The other few photos show me holding a piece we need to cut to fit into the 2 upper sections which need replacing.
And now the final update for this post, quite a long one but thats because we did so much over 2 days! With only 2 small strips needing to be welded onto the chassis side of the roof section, the chassis would then be ready to have the roof skin welded back on!
First section to tackle was the huge hole on the rear where the boot hinge bolts to, it's very common for rust to appear there on the wagons, even some of the hatches. Sealant cracks, water gets under, gg. We cut out the rust affected area and followed similar methods from bending a piece to go under the windscreen which we previously welded in. Took a little bit of fiddling around, including cutting a new piece of sheet metal and starting again but we eventually got the shape working. The crease in the middle of it we could not replicate 100% but this should be fine. Traced the holes for the hinge which will be cut out later, then made some final cuts, neatened her up and done! Once again, we are starting to scare ourselves with how these panels are turning out! I ran out of gas as I had to weld some stuff for my brothers S13 drift car, so I'll have to refill my bottle this Friday, with more welding to reoccur this weekend. Stay tuned!
Update time!
Weekend that just past, a decent amount of work on the Wago took place, with the possbility the roof shall be welded on next weekend! Big update with many photos so incoming spam..
We decided to continue and get the roof skin all repaired, theres 5 rust spots in the front of the roof itself, all which would have been under the windscreen. The windscreen had been replaced so I'm assuming not done properly, water leaked under the seal and the rust occured. Started off with cutting out the 5 sections, only cutting off the outer skin. Next marking those pieces onto my original roof (which we are using for replacement pieces) and begun cutting them. Once cut, final grinding was carried out to ensure a good fit for each piece.
From left to right (drivers to passenger)
So you now might be wondering, why didn't I just repair the other roof as the front of that one is mint! Well, 3/4 of the drivers side where the roof dips down into the side channel was completely rusted out, more rust on the rear than this one, and the roof rack holes were welded in, rusted out and roof rack studs cut off the mid section of the roof. Both skins had pros and cons, I simply went with this one as all roof rack bolt holes/studs were still there and seemed harder to replace.
After moving roof skins back and forth & the car sat there without a roof for a few months, everything still lines up shmick! Didn't get any photos, but we bolted in the sunroof to position it with the hole in the roof. Also, the rear 2 tabs for the sunroof on the driver side were also rusted out, the bolt snapped when trying to undo, completely rusted. So I drilled the 2 brackets off the spare shell, wire brushed and welded them on!
With this done, we cut the 2 pieces required to replace to upper skin chassis side where the roof lays (previous update we did the bottom ones). I didn't take many photos of each bit inplace/welded/grinded, but they were welded up and grinded down, ensuring the distance from the top of the pillar to the piece we were welding in was the same as the untouched passenger side. I will admit, my welding skills were a bit off today. Not to mention on the right side it kept blowing holes here and there so had to fill them up. Was trying the stitch weld method where you weld for a second then let off, as oppose to a constant pool dragging it across, as that will generate too much heat.
and to finish the update off, 'mocking up' a turbo from my brothers drift car :P
Weekend that just passed we made some big progress, to the point where the roof is now ready to be welded back on. However just as I was making a coffee before looking at the wagon my mate Ram messaged me 'DROP EVERYTHING RING NOW!' with a link to Pick N Payless (wreckers), with the link containing a JDM import Honda Legend, with some goodies. $59 AUD later :P
For the actual wagon work, the day started off with bending up another piece of sheet metal for the roof skin hinge section on the other side. Same process as the other sode, just obivously flipped. Once this was done I went about running the wire wheel over the underneath of the roof as surface rust had started to appear around the edges of the webbing.
Next up we placed the roof skin back onto the chassis and positioned the 2 tabs so the 2 square holes for the hinge could be marked from underneath. Once drilled a square file was used to achieve the square hole.
With these 2 tabs ready, we left them 'bolted in' on the hinges and went around tacking them, followed by completely welding it up off the car. We stood the roof up vertically where there was a step in the back yard so I could weld the area flat. Came out quite nice, one or two small holes blew through so a little extra welding was required! And the roof is ready to be welded on! I'll have to grind down the welds first obviously but apart from that we are looking good! The roof skin was then laid upside down on top of the car and I sprayed the areas I wire wheeled with some weld through primer, same same. I also put down some rust convert on the chassis side where the roof lays, passenger side as there was still some small areas of pitting, any further wire wheeling and there will be no metal left.
Some good progress was made this weekend, so happy! Saturday started off with grinding down the 2 tabs I welded onto the rear of the roof skin (replacing rust) so they were flush with the rest of the roof, one or two minor holes were found, re-welded and grinded down again. With this done we placed the roof skin onto the car, bolted in the sunroof and the factory roof racks as well. We did this as the sunroof and roof racks would allow use to position the roof to where it should sit, as if it's welded in the incorrect position the sunroof won't line up, along with things like the windscreen etc
With this sorted we lifted the rear of the roof skin to lay down some sealant, from factory theres an expanding foam placed here to hold the roof skin down to the back of the chassis, just in front of the boot hinges. Wasn't sure where to get this expanding foam, to be honest I didn't really look but decided to go ahead with some Sika automotive sealant, she'll be right. The roof was then placed back into position and everything realigned, ready for welding.
It was a scary process at first, little nervous the weld wouldn't go all the way through/hold but after the first weld drivers side in the middle, I shortly realised this would actually be fairly simple. I pumped the weld in, holding the welder on the spot weld location and moved it around, trying to get a lot of heat into it so it would sink through all the layers to the bottom. Went around the roof with dad holding down the roof skin next to each spot weld with a flat head and yeah, its done! Beers were cracked during the process and after when completed, to finally have it welded in is so satisfying, the roof has been off the car for quite a few months, now with it back on I can move the car around and try to start it/drive it! I do still need to grind down the welds and prep it for body sealant, also need to weld the 4 tabs in across the front of the roof as you'll see in one of the photos below, but that will be easy. We are very happy with our work, considering we have never done something like this, to see the roof sitting there now is a good feeling. Can't wait to drive this!
Been a few weeks since last update, been very busy with uni assignments and now studying for my final exams next week. 2 weeks ago we grinded down the spot welds around the roof. Also went ahead and welded in the 2 corners on the front of the roof. Once all this was down, grinded back smooth we then went ahead and applied the sealant to finally finish off the roof install. I bought 2 tubes but only needed 1, can't complain with spares! So happy the roof is now finally sealed, it means I can try to start the car for the first time and drive it!
My buddy Kev got my old RS3's from my track wheels on my ED hatch mounted onto the zender turbos I bought for the wagon. Can say they would look dope on the daily SP20!
Annnnd I came home today to these 3 parcels from Japan, yes I've been doing some Yahoo Auctions shopping lately! 4WD mud flaps, beagle front head rests and another catalogue to add to the collection!
So not much has happened on the wago as the past 3 weeks was end of uni semester and then exams straight away, so I was jam packed finishing off assignments/studying for exams. That is all now done, so it's all guns blazing on the wagon, first off however I needed to sort out the parts wagon so we can scrap it and get it out of the way. The motor was unbolted and resting on chassis, unbolted a few brackets and then.. just lifted the car over the motor lol..
Then dragged the motor out and onto the crane to drop the box as I'll keep it for spares, rare RT4WD box. Also it's quite easy to drop the subframe/steering rack assembly with the car like this, should do more often on other cars..
Buddy Dutch in VIC has a spare wagon which took a hit to the drivers rear corner, for him to source that section would be impossible as these cars are so hard to find, luckily I have this piece of crap though. Weather was too hot for me so I let mi old man go ham with the grinder
Waiting for a mate
And that was that, got some other random bits of metal lying around, the motor that came in this and a broken gearbox or two and chucked it all in, ready for scrap later this week. Next Saturday I'll hopefully do a little bit of work on the wagon however Sunday I have a track day at Wakefield so no wago on that day. I'm really going to push for all rust to be repaired by the time I go to Japan next January the 8th, as when I'm back I want to register it and drive it, even with the paint as is.
Also picked up some spare RT4WD rear trailing arms tonight off the guy I bought the crappy wagon off, he decided he didn't need them no more and yeah.. I like spares
So got some progress done last weekend, not a lot but it has directed our future steps with what to do. First off to start the Saturday was to get rid of the crappy parts wagon, had our new pommy scrapper come pick it up, cya later hunk of junk. Now the sedan can do back to its resting spot on the gravel spot. The wagon then finally came out of the garage, it's been quite a whilst since it's moved as with the roof off it's not ideal to move it around, the chassis could possibly flex out of alignment. I brought it out to put on my spare Honda Fat 5's so I could sell the wheels which came on the wagon for some extra spending money for Japan at the start of 2019!
Okay so here is a bit of ramble in regards to our next steps, it was time to tackle the rust spots under the window. In the photo below you'll see what we have already cut out with a piece still there where the hinges for the bonnet bolt down to. There is usually a think layer over this to cover it, which was rusted away completely, as in it was a huge hole when we got it. You can see on the top of the photo, where it would be the bottom corner of the windscreen, passenger side that there is still pitted metal. Underneath that there is rust of a lower layer of metal, however the piece on top is quite solid still which we didn't want to cut.
However all rust needs to come out, so what we plan to do is cut off that top pitted layer completely and replace, it will be tricky trying to tab up a piece to the correct shape especially as its where the windscreen lays, it needs to be spot on. At the bottom corner of where the engine bay is behind the shock tower is also rust from wheres its run down on top, you can kinda see it in the photos. This too needs to be cut open and replaced as well
To finish off the day I just soaked the hinges in WD40 as they were seized up and kept moving back and forth until they freely moved, and started wire brushing away the rear passenger corner. It was covered in primed, which contained a lot of body filler under neath, however not sure why. Previous owner had mentioned there was rust repairs done there (still rust there from incorrect rust repairs) however the filler makes me a little confused as its over perfeclty fine metal... oh well
So yeah we have quite a fair bit of work, Monday night I went over to my fathers (where the wagon is stored) for dinner and so we could just look into what needs to be done with this front windscreen area. My dad suggested we remove the motor was well so we can stand in the engine bay especially for those corners behind the shock tower, just for some ease of movement and to confirm any rust in the engine bay lower down. Saturday I will but some new battery terminals from SuperCheap Auto and use my hatch battery to try start it, I want to jack the wago up and test the 4WD system to ensure it works, would also be cool to see if the wago even starts as I havn't tried that since I've bought it. Stay tuned!
Damn it's that time, end of the year, everything is so jam packed with birthdays and Christmas coming up. Finally had some free time today to work on the wagon. Last Wednesday I had my RDO and my dad left work a tad early so we could drop the motor out of the wagon. The previous weekend we were mucking around on the wagon and cleaning things up, finding a little bit more rust under the windscreen on the passenger side in the section we are already working on. We decided to go ahead and drop the motor so we could stand in the engine bay to give us some more room, and lets face it, it was going to come out anyways.
Why is the driver CV still in there? It's ceased and rusted up, used the worlds biggest breaker bar and still no luck, need a rattle gun. However we still wanted that motor out, a little bit of angling and she still popped out.
So with our time today, we decided to strip the rest of the inside out, everything thats normally behind the dash like AC, heater core, loom etc, everything came out. The pedal assembly is super crusty, looks like it's a replacement from the wreckers before and they've also rewelded it as well for some strength/to fix a previous break.
Annnd she's stripped. I started vacuuming the inside and noticed the sound deadening was already loose and coming up with ease, soo for the next 1hr with a hammer and flat head me and dad got most of it out, the sun was shining on the front section thats left, it got hot and wouldn't pop off. Was very suprised how easy it came out without dry ice, which I had to use on my hatch. I'm planning to lay dynamat throughout the entire car in the future as well before the interior goes back in.
BEFORE
AFTER
Back to rust, passenger side windscreen. The chassis part in the picture below is a little crusty where it goes up the side, so we decided we will just cut it out and replace. Upon cutting we were presented with where rust has run down the side of this join, wire brushed a little and only looks like surface rust. Will need an actual wired brush we can shove down the small hole, clean it up and then lay down some rust converter and paint. Will continue on Boxing day after some lunch I believe!
My latest purchase, a mint Honda Motocompo
So the garage got a brand new 2 stroke pressure cleaner for Christmas, so to start off the day we decided to clean the entire car, so much crap in the wheel weels and engine bay! Some of the paint even came off from the chassis behind bumper bars etc
As I'm going away to Japan next Wednesday for 3 weeks we decided to just cut out any rust we could find as I got a new dremel for Christmas to get into those tight corners, and then spray in the weld through primer to protect it until I'm back, first off was the corner behind the passenger shock tower:
Before:
After:
Behind the rear wheel, passenger side
Before:
After:
Next up was this crusty rear passenger corner, previous owner mentioned a rust repair around the tail light area (common rust spot) however it looks like whichever dodgy/useless 'panel beater' did this did a peasant job, and yes, now even worse with more rust.. Yep this one is interesting, kinda don't want to think about it until after Japan
Before:
After:
Outside view:
Annnnnnnd then the icing on the cake. You may have seen in previous photos, the passenger rear corner had primer on it from the previous tail light rust repair job, I decided to take back the primer to see why they sprayed so far up the panel.. sigh definitely a big toll to the build.
The circled areas are where the damage is, unsure what caused it but dented in panels, not going to lie when I found this I thought to myself why am I even bothering with this, but I'm not quitting on this so my father and I will sit down and look at it when back from Japan and go from there, try our best to pull it and fix it properly, I'm sure some bog will be required for the finishing touches. So with this I decided to just spray everything in primer and leave it at that.
Well well well, been a while since an update. Went to Japan for my 3rd trip (awesome as always) and since back I've been so busy every weekend there has been no time for wago. Got a compressor for my birthday in Feb which is a nice addition to the garage, we also tidied it up with a big sort out of all the random car parts lying around. Now we are ready for progress!
I want this rust sorted, I've owned the wagon for over a year and theres still tons of rust in it. First starting off with the passenger section under the window. Today we made up a piece for the lower section which is the frame of the car, quite easy to mock up. The factory piece has a bend in it however it would be hard to replicate that. We opted for this instead, fits in quite snug. Bent up the end to go up the frame with a slit cut as well as can see.
With this sorted we then went ahead for the lower part behind the shock tower. Similar process, cut a piece with a few slits to bend a flange on it (as we called it). I'll weld this piece in first as we have the hole above to shove our hand through to support the back of this piece when welding.
Last off for today was cleaning up this piece which goes on top of the frame piece we fabbed above. This came off the car with a bit of pitting here and there. Quite a strong piece with some angles in it we wouldn't be able to replicate including the bolt holes for the bonnet hinge, so I went about wire wheeling and grinding it back, and welding up some holes in it
Couldn't get the pitting out of the section near where I'm holding it, will have to go at it again with the dremel
*Update Time*!
Been a little lazy on the updates, usual excuses.. Anyways I'm catching up on a couple weeks of content.
So I got a sand blaster as I wanted to give it a shot, first testing around the passenger corner sides I've been working on, under the windscreen. Got some cheap drop sheets and stappled them the the support beams above the car for the roof for the garage. It still went everywhere, and I wasn't overly impressed with the outcome as it didn't seem to remove as much as I thought. It was a fairly strong grit, maybe I need a stronger material.
After that we attended to the area behind the shock tower which we had cut out. Forgot to take pics of bending the piece but dad went ahead and got this fabbed up in no time. Drilled a few small holes on the flaps so I could weld it down as well. There was bit of a gap on the right side in the 2nd photo you can notice it, we bent it back when welding. Trying to grind this area was impossible with a normal grinder, so off to Bunnings Warehouse I went and get a die grinder to run off the compressor, lovely! Bloody grinding bit was more than the grinder itself -.-
Took about 3 attempts of grinding down, then welding up mini holes that appeared.. I'll admit, I wasn't too happy with some of the welds, just wasn't working for me plus in bit of a crammed corner which I couldn't get in with a good angle for the welder.. Oh well. This is what I got it grinded down to, sprayed with some primer and left for now. I'll go back later with a different tool to get some finer grinding done before paint.
Next up I finally decided to go about welding in the 3 pieces across the front of the roof. I could of done this when I put the roof on, but for whatever reason I wasn't bothered and yeah.. So here we are, already have the pieces ready, just a simple matter of clamping them up, tacing and then welding completely. Started off with the piece closest to drivers side, it welded up very easily and I was happy with it. Had a little bit of trouble welding the section where it runs down vertically, gravity just stuffed with me..
The two pieces on passenger side needed some persuasion with a flat head from under neath, to level the metal. Had a bit of a gap to fill in for the right piece, wasn't too hard. Trying different settings on the welder throughout welding this section as I couldn't find a setting I was comfortable with. Now I've found Amps on 2 and wire speed 3 or 4 works fairly well.
Annd all done, grinded each section back, there wasn't many holes at all to re-weld. Just needs some fine grinding and possibly some body filler when coming up for a final finish before paint, for now this will be just fine.
Rolled her outside for a bit of fresh air, nice to look at it from an angle like this. Cannot wait for the day I can drive it!
During the week, dad went out and bought himself a drill press as his been wanting one for a while, we need it to drill some holes for the bottom piece passenger side, and it would be a nice addition to the garage
Didn't get too much done today, bit sick + in pain from a wisdom tooth coming through.. Drew attention to the drivers side under the windscreen, we previously cut out some of the rust that was here, most of it was eaten away, should be photos at the start of the build thread but I'll include one here for reference.. Similar process for this side as the opposite side.
This is as must as we wanted to cut out, the bottom layer had to come out and there was some rust holes and as we are already here, might as well replace as well. The piece to replace this is below as well which we made up today. It's the shape it is as we can't go too far back as the top chunck which we have kept will be in the way to weld. Once this bottom layer piece is welded in (next weekend) we will decide what to do for the 2 layers above.. We have been thinking of just leaving what would be the middle piece and welding a piece onto the top layer to fill up this massive hole... Shall see
Havn't had much progress in a few months, just finished off my University semester, in a few weeks time I'll be putting in some big hours to get this metal welded in up front so I can move onto the door jam rust and then the rear quarter. I want to have all rust sorted well before the end of the year, so I can prep for a full spray job!
Yeah it was quite scary, but felt I needed to just find everything ASAP and get working on it. Thanks, I'll be continuing on it in 2 weeks times, will update when I do!
Thanks mate! Yeah felt I should of had the build thread here as well.. It's here now
Kinda annoyed how it seems all the posts have stayed on this first page.. Anyone know why this would have happened/how to fix.. Admins?
Yeah I've seen it many speak of it, always like to see others doing the same. I'll be working on it a bit this weekend welding in some new metal up front, so stay tuned!
Last weekend we continued, first tackling the drivers chassis replacement piece which is in the last photo above. Went in easily, welding was a bit 50/50 as its been a while, however not too fussed as it's getting ground down.
Now to do the same with the passenger side, first tacking in then going around welding it, followed by grinding. Prior to all we drilled these holes which were mirror off the initial rusty piece which was cut out. A newly purchase set of christmas tree drill bits were used, first time using them and I must say they work the treat!
To finish off the day we bent the drivers side piece over, which after I realised it's meant to be the layer on top which is bent over (oh well). I was also given a free D16Y1 a few months ago to add to the 'collection', sorted some pallets from dads work with a bit of cutting, fitted quite nicely under the side bench.
With the panels, we were able to bolt down the bonnet and align everything. This was because the next piece to weld in was the threaded piece for the bonnet on the passenger side. It was clamped in place whilst algining and then I cranked up the amps and pumped the weld into 2 spot welds on the piece. The top one which you can see below was there from factory, the bottom one we drilled ourselves. The top one was the only one we saw when initially removing it, no idea what else held it down apart from the layer which goes above. I did not want to take any chances with the bonnet flying off whilst driving. I'm still contemplating welding around the edges of it before putting the piece over it.
With this sorted my dad starting working a piece for the top of it, whilst he did this as it's a 1 man job I started on this, well horrible previous rust repair job by someone in the past, on the drivers door jam. My plan was to grind the aids back to level with the body and assess how bad it still is, as the door stopper piece is still quite solidly welded in there. Theres still some weld inside which has surface rust which the grinder won't reach to. I can either weld up some the holes around it to clean it up and leave it, or cut it all out and do again.. Still unsure what to do as there are 2 layers there..
Also grinded back this surface rust under the door hinges
And so this is where we are at, this is will cover the lower part, with a seperate piece to cover the upright. They will obviously be welded together. To make 1 whole piece seemed kinda tricky so dad thought this would be an easier method.