DIY: How to convert your 9.5" brakes to 11.0" brakes - S2000
 BrakeExpert
New Wagonist
BrakeExpert
New Wagonist
DIY: S2000 11.0" Brake upgrade
How to convert your 9.5" brakes to 11.0" brakes
This applies for The 9.5" knuckles, which I believe is all of them on the wagons, unless you've swapped on 90-91 Civic EX or DA Integra knuckles.
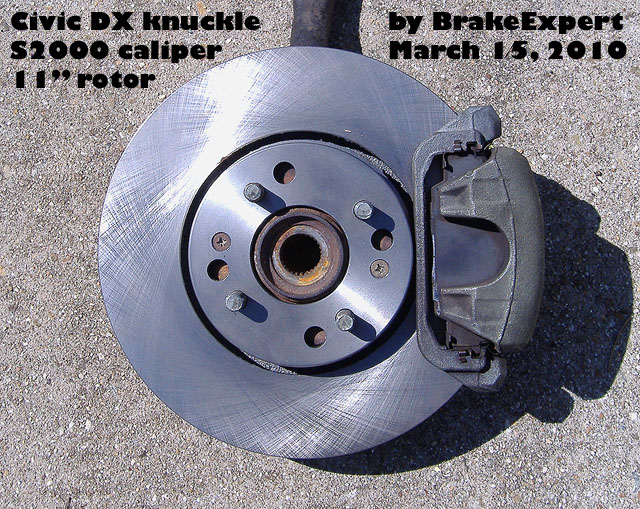
PRELUDE: This will cover how to convert your front 9.5" Honda brakes into modified S2000 front brakes. This upgrade will improve your braking performance. This setup offers a larger sweeping area, a lightweight but stiff caliper, increased brake torque over a larger disc rotor, increased resistance to fade, and Honda reliability. This setup uses stock knuckles and stock brake hoses. If you are getting a kit from BrakeExpert, the modifications have been made and it is a bolt on uograde.
NECESSARY MODIFICATION:
The rotors used are too tall, as they are with the Type-R brakes, so the brackets must be milled. Since this is the surface where the bracket contacts the knuckle, alignment is critical, so having them precision machined is necessary, a grinder will not work.
The rotors used in this are not hub-centric. Since this is essential to keeping the brakes vibration free, a set of centering rings is used. Because this ring is only used to go between the rotor and hub for installation, it can be made of aluminum or a hard plastic, as well as steel.
Tools: 17mm wrench, 14mm wrench, 12mm wrench, phillips screwdriver, socket wrench, 10mm wrench, torque wrench, rags, 10mm brake line wrench (optional), impact wrench (optional), ball scratcher (optional.)
INSTALLATION:
1. Park the car on level ground. Engage the e-brake and place the car in Park or first gear. Place a brick behind each back wheel. Acquire all necessary tools.
2. Break the lug nuts loose, jack up the front wheel by the jacking point, and remove the lug nuts. Then, remove the wheel.
3. Remove the rotor retainer screws (use the impact wrench if your car is older or from an area by the ocean or that has salted roads in the winter.)
4. Break loose the two 12 (or 14)mm bolts on the slide pins that attach the caliper to its bracket.
5. Break loose the 14mm banjo bolt. Retighten only to the point where brake fluid stops dripping (Get your rags, it will get messy in a minute.)
6. Unbolt the 10mm bolt(s) that hold the brake hose to the steering knukle.
7. Unbolt the 17mm bolts that hold the caliper bracket to the steering knuckle. The caliper/bracket/pads will be loose. Don't let this dangle by the brake hose. Either undo the 14mm banjo bolt at the caliper, or to prevent loosing as much brake fluid, put the caliper still attached at the brake hose and rest it on the tie rod (this will not affect your car's alignment.)
8. Remove the brake rotor. If its sticking, take the 10mm that holds the brake hose to the knuckle and stick it in the rotor's removal screw hole and tighten until the rotor unsticks itself from the hub. (remove the bolt from the rotor when the rotor is off.)
9. Place the centering ring on the hub, and then place the 11.1" rotor onto the hub. Use one of your lug nuts to hold it in place, as the rotor screw holes will not work on this rotor. They are only there to keep the rotor in place while putting the wheel on. When the caliper and bracket are on the car with the pads against the rotor, the rotor will be held in the right place so these screws aren't needed.
10. Bolt the S2000 caliper/bracket/pads onto the knuckle and tighten the 17mm bolts to 80 lb-ft. Make sure the caliper goes on the correct side - the bleeders should be pointing UPward. These calipers are non-directional so it is not critical to ensure which is the left or the right, only that the bleeder points upward.
11. Time for the messy part. Attach the brake hose from the older caliper onto the S2000 caliper. If you are using new crush washers, tighten them to 20lb-ft. If your old ones are in good enough shape, and you don't want to pay the 16$ from Honda for 4 new ones, wash your washers with soap and water, dry, and tighten the banjo bolt over the washers and brake hoses to 35lb-ft.
12. Press the brake pedal until the pads contact the rotor. Remove the lug nut holding the rotor on. This side is done. Put the wheel back on the car. Torque the lug nuts to 80 lb-ft for steel wheels, 75lb-ft for aluminum wheels.
13. Lower the car and remove the jackstand. Repeat steps 2-12 for the other side.
14. If you are upgrading the master cylinder, remove the MC by unbolting the 10mm bolts on the hardlines with a brake line wrench and then the 12mm bolts from the brake booster.
15. Bench bleed the master cylinder. If you are lazy and don't mind making a mess, fill the resovoir with brake fluid with the new MC out of the car. Use a screwdriver to push into the cylinder bore(EK/98+ Teg) or press on the piston if the MC has a 1” aluminum rod sticking out the back. Do this about 6 times, fluid will gush out of the two holes.
16. Install the master cylinder onto the brake booster and tighten the 12mm bolts and then tighten the 10mm brake line bolts.
17. Your brakes are on. The new brakes must be bled. Use either a factory service manual for bleeding procedures, or check online for a standard bleeding procedure on hydraulic brakes. The proper bleeding order for Civics/Integras is Right Rear, then Left Front, then Left Rear, then Right Front. This is because of the crossed brake system; do not go by the method of fartest to closest (to the master cylinder). I reccomend bleeding the whole car, however if you are not changing the master cylinder (and you do not have ABS), you can bleed just the front brakes, however I recommend bleeding all 4 brakes anyway.
18. Bleed the brakes.
19. Your brakes are on! Ensure the pedal can stop the car by removing the bricks, releasing the e-brake, and moving the car slightly. Stop the car with the pedal, if it does not stop, use the e-brake and check the brake system for bubbles by bleeding the car again.
20. Brake in your new brakes pads by standard brake pad brake in procedure. I reccomend finding an empty straightaway. Get the car upto 50mph and hit the brakes lightly, slowing the car to 10mph, but not to a complete stop. Do this about ten times, not giving your brakes time to cool in between. Your brakes will be pretty warm afterwards, so find a place to stop the car and let the brakes cool to under 100 degrees if possible.
21. Enjoy the performance of the lightweight and effecient S2000 brakes on your Honda!
Anything I missed, feel free to PM me. If you have any questions, feel free to PM me or post them. If you are interested in buying a kit, PM me.
by BrakeExpert
How to convert your 9.5" brakes to 11.0" brakes
This applies for The 9.5" knuckles, which I believe is all of them on the wagons, unless you've swapped on 90-91 Civic EX or DA Integra knuckles.
PRELUDE: This will cover how to convert your front 9.5" Honda brakes into modified S2000 front brakes. This upgrade will improve your braking performance. This setup offers a larger sweeping area, a lightweight but stiff caliper, increased brake torque over a larger disc rotor, increased resistance to fade, and Honda reliability. This setup uses stock knuckles and stock brake hoses. If you are getting a kit from BrakeExpert, the modifications have been made and it is a bolt on uograde.
NECESSARY MODIFICATION:
The rotors used are too tall, as they are with the Type-R brakes, so the brackets must be milled. Since this is the surface where the bracket contacts the knuckle, alignment is critical, so having them precision machined is necessary, a grinder will not work.
The rotors used in this are not hub-centric. Since this is essential to keeping the brakes vibration free, a set of centering rings is used. Because this ring is only used to go between the rotor and hub for installation, it can be made of aluminum or a hard plastic, as well as steel.
Tools: 17mm wrench, 14mm wrench, 12mm wrench, phillips screwdriver, socket wrench, 10mm wrench, torque wrench, rags, 10mm brake line wrench (optional), impact wrench (optional), ball scratcher (optional.)
INSTALLATION:
1. Park the car on level ground. Engage the e-brake and place the car in Park or first gear. Place a brick behind each back wheel. Acquire all necessary tools.
2. Break the lug nuts loose, jack up the front wheel by the jacking point, and remove the lug nuts. Then, remove the wheel.
3. Remove the rotor retainer screws (use the impact wrench if your car is older or from an area by the ocean or that has salted roads in the winter.)
4. Break loose the two 12 (or 14)mm bolts on the slide pins that attach the caliper to its bracket.
5. Break loose the 14mm banjo bolt. Retighten only to the point where brake fluid stops dripping (Get your rags, it will get messy in a minute.)
6. Unbolt the 10mm bolt(s) that hold the brake hose to the steering knukle.
7. Unbolt the 17mm bolts that hold the caliper bracket to the steering knuckle. The caliper/bracket/pads will be loose. Don't let this dangle by the brake hose. Either undo the 14mm banjo bolt at the caliper, or to prevent loosing as much brake fluid, put the caliper still attached at the brake hose and rest it on the tie rod (this will not affect your car's alignment.)
8. Remove the brake rotor. If its sticking, take the 10mm that holds the brake hose to the knuckle and stick it in the rotor's removal screw hole and tighten until the rotor unsticks itself from the hub. (remove the bolt from the rotor when the rotor is off.)
9. Place the centering ring on the hub, and then place the 11.1" rotor onto the hub. Use one of your lug nuts to hold it in place, as the rotor screw holes will not work on this rotor. They are only there to keep the rotor in place while putting the wheel on. When the caliper and bracket are on the car with the pads against the rotor, the rotor will be held in the right place so these screws aren't needed.
10. Bolt the S2000 caliper/bracket/pads onto the knuckle and tighten the 17mm bolts to 80 lb-ft. Make sure the caliper goes on the correct side - the bleeders should be pointing UPward. These calipers are non-directional so it is not critical to ensure which is the left or the right, only that the bleeder points upward.
11. Time for the messy part. Attach the brake hose from the older caliper onto the S2000 caliper. If you are using new crush washers, tighten them to 20lb-ft. If your old ones are in good enough shape, and you don't want to pay the 16$ from Honda for 4 new ones, wash your washers with soap and water, dry, and tighten the banjo bolt over the washers and brake hoses to 35lb-ft.
12. Press the brake pedal until the pads contact the rotor. Remove the lug nut holding the rotor on. This side is done. Put the wheel back on the car. Torque the lug nuts to 80 lb-ft for steel wheels, 75lb-ft for aluminum wheels.
13. Lower the car and remove the jackstand. Repeat steps 2-12 for the other side.
14. If you are upgrading the master cylinder, remove the MC by unbolting the 10mm bolts on the hardlines with a brake line wrench and then the 12mm bolts from the brake booster.
15. Bench bleed the master cylinder. If you are lazy and don't mind making a mess, fill the resovoir with brake fluid with the new MC out of the car. Use a screwdriver to push into the cylinder bore(EK/98+ Teg) or press on the piston if the MC has a 1” aluminum rod sticking out the back. Do this about 6 times, fluid will gush out of the two holes.
16. Install the master cylinder onto the brake booster and tighten the 12mm bolts and then tighten the 10mm brake line bolts.
17. Your brakes are on. The new brakes must be bled. Use either a factory service manual for bleeding procedures, or check online for a standard bleeding procedure on hydraulic brakes. The proper bleeding order for Civics/Integras is Right Rear, then Left Front, then Left Rear, then Right Front. This is because of the crossed brake system; do not go by the method of fartest to closest (to the master cylinder). I reccomend bleeding the whole car, however if you are not changing the master cylinder (and you do not have ABS), you can bleed just the front brakes, however I recommend bleeding all 4 brakes anyway.
18. Bleed the brakes.
19. Your brakes are on! Ensure the pedal can stop the car by removing the bricks, releasing the e-brake, and moving the car slightly. Stop the car with the pedal, if it does not stop, use the e-brake and check the brake system for bubbles by bleeding the car again.
20. Brake in your new brakes pads by standard brake pad brake in procedure. I reccomend finding an empty straightaway. Get the car upto 50mph and hit the brakes lightly, slowing the car to 10mph, but not to a complete stop. Do this about ten times, not giving your brakes time to cool in between. Your brakes will be pretty warm afterwards, so find a place to stop the car and let the brakes cool to under 100 degrees if possible.
21. Enjoy the performance of the lightweight and effecient S2000 brakes on your Honda!
Anything I missed, feel free to PM me. If you have any questions, feel free to PM me or post them. If you are interested in buying a kit, PM me.
by BrakeExpert
This discussion has been closed.
Comments
All Type-R integras are 5 lug and this setup can be had in 4x100 with modification. All S2k calipers will work. PM'd.